Author Topic: My C5 accessory blog..  (Read 16809 times)

0 Members and 1 Guest are viewing this topic.

Sub

  • Bob's Your Uncle
  • Grease Monkey
  • ****
  • Posts: 435
  • Karma: 0
  • 2010 Black Bullet C5
on: July 29, 2010, 05:09:30 pm
Thought I'd make a page to show some pics of mods and stuff I've done. Might be interesting to someone! :) I'll try and update the page as I do more things.

_______Purchase__________
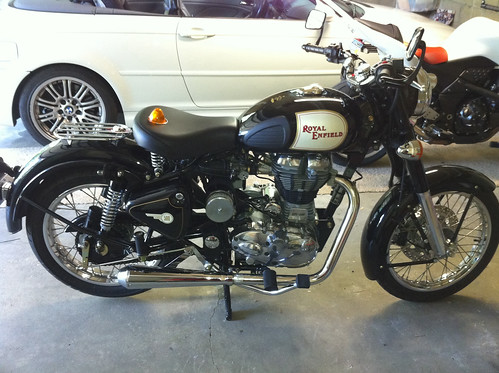
Bought my bike  in July 2010. Here it is in all her (his?!) glory...


For the curious, here is my other ride.. A 2008 Kawasaki z1000 which I've owned for a couple years now. FWIW, I havent cranked it over since getting the Enfield. :) This is not to say I'm selling the Z, its a fantastic bike and I love it. The two bikes complement each other very well, that is, they couldnt be more different!


Onto the mods..

_______Mirrors, Part Un__________
I picked up a box of nfieldstore goodies at the same time as my bike, so I was able to have some modding fun right away.
First in order was the mirrors.. The stockers gave me only a nice view of my elbows. Napoleon type mirrors from enfield went on.. Promptly found a problem - the 2010 C5 has threaded inserts instead of a hollow tube, so some modification had to happen to get these on.


The easiest solution was to grind off the black bit that normally extends into the bar so that it was flat. I used a step bit to get most of the material off, then dremeled up the rough bits left over.


Here is a pic of them installed. Note that there is still a good sized gap left when you remove the oem bar end weights - I opted for a piece of black tubing sliced thin and stretched it over the bar. Worked out pretty well and didnt cost anything.


_______Garage Door Opener Mod__________
The next mod I wanted to do was the garage door opener. I've done this mod to all of my bikes in the past. It makes it easier for obvious reasons and with a little careful soldering, its quite easy to do.
I bought an extra mini remote and took it apart and found where the switch contacts were and soldered telephone wire to each leg of the switch contacts. The other end goes to a simple push button switch (Radio Shack). I used about 3' of some old phone cable to connect the two and wired the garage door opener into the fuse box area (you can just make it out at the bottom there - It has black duct tape around it to secure the wires):


This is where I zip-tie mounted the switch - on the right side, right below where the seat and tank meet. It blends in when you look at the bike, so thats good.


It works great and range doesnt seem to be affected by being in the fuse box area.

_______Dash Accessories__________
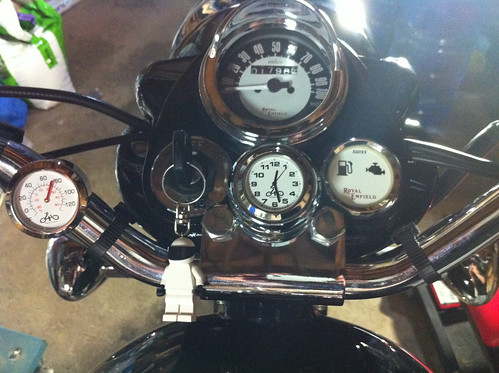
I went a little accessory crazy and picked up the thermometer, clock. They are actually high quality, look great, and work well.


Notice I also have the speedo surround from the nfield store. I wouldnt recommend it, its light plastic, doesnt fit very well, partially blocks the three indicator lights from view and is held on by three tiny pieces of double sided tape which are sure to fail soon. Well, its neat for the time being, and if it goes flying, so be it. :)

Mr SantaLegoMan adds 1Hp

_______Luggage Rack__________
Up next was the rear rack. I really like the look of it and it was one of the first accessories I knew I wanted. I bought it from Nfield and apart from some touched up areas with silver spray paint, it looks pretty good. I had to reshape one side of the mount where it touches the fender because it was squared off. I used a vice and some small blocks of wood between the bars to get the curve correct.

This is a slightly scary mod because I've never drilled paint before. I used a punch first to make sure my holes didnt wander. This cracked the clear coat in a 1/4" diameter, which doesnt matter as I'd be drilling it out anyway, but was still shocking. :) I then used  a step bit and it made quick work of the holes and it drilled nicely. It left some burrs underneath, but I was able to smooth them out. I painted on a bit of auto spray paint to the bare metal to avoid rusting and then used washers which had rubber washers affixed to them to ensure water would stay out of the area. Perhaps a bit on the paranoid side, but I had them so why not.


I also didnt like the idea of the bare chrome vibrating on top of my fender paint (in case I ever wanted to remove it), so I used some clear, thin 3M VHB double stick tape in between the fender and the luggage rack. This not only protects the paint but adds a lot of strength. This is not normal double sided tape, its industrial strength and its what manufacturers use to affix body moldings to the sides of cars.


I'm very happy with the result. When I did tighten it down, the rack did shift slightly and its just ever so crooked, so if you're installing yours, watch for that.

_______Rear Passenger Seat__________
The next part of my rear rack mod was the rear seat. While I was waiting for my bike to arrive I researched rear seat options, knowing that I definitely wanted the rear rack on there most of the time. I decided to get a "Butty Buddy" rear seat and affix it to the top of the rear rack. I wanted a rear seat that was not permanent but was easy to put on and remove. This ended up working out perfectly.

The Butty Buddy sort of snaps over the rear luggage rack and then two straps are used to really secure the seat. I put the straps over the rear frame and connect to the underside of the fender lip. When all locked down the rear seat is very solid and there is no rocking around or fear of it coming off. Although the padding is firm, my pillion rider commented that it was the most comfortable seat I've had so far on any of my bikes.

Here are some pics..


_______Megaphone Silencer__________
Next thing to sort out was the pipe. I didnt like the hefty look of the oem one and it was too quiet for me. I installed the megaphone pipe from the nfield store. Surprise surprise, it needed modification too! The mounting bar needed to be bent pretty much straight, and the hole bored out to fit over the rear peg mounting bolt. The diameter from the pipe to the header pipe was about 4mm too large, so in my haste I decided to just crimp the hell out of it to get it on there. I didnt have anything that would sort that out on hand, and I was excited to see what it sounded like. I did manage to get it crimped on there, but it did leave holes where exhaust could escape all around the slits at the end connecting end of the pipe. The safe conclusion to draw is that this pipe was not designed for the C5, but its close.

A pic of the joint and ugly clamp:


Heres a pic of it installed:


BTW, the megaphone is completely hollow inside, there is no sound deadening so its basically a open pipe.

The sound is actually quite nice and aggressive. Its more raucous cafe racer than English gentleman. It is loud, and I do worry about attracting unwanted attention. I like the backfiring (gunshots?!) it gives on off throttle slowdowns. It makes a very addicting tiger like grown in between shifting up through the gears as the revs drop slightly. Overall I love the sound, its just a tad loud perhaps. I also think the look suits the bike and it looks great in person.

_______Emgo Silencer__________
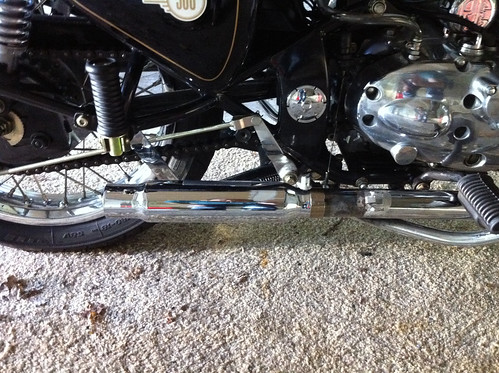
After only a couple hundred miles, the megaphone started to yellow! While I was at a local enfield dealer, I picked up another pipe for $60 (less than 1/2 the price of the nfield megaphone). It is branded by Emgo, and is definitely of higher quality than the nfield piece - twice the quality for 1/2 the price! It looks identical, but it uses a perforated pipe inside and light packing along the length of the pipe. The mounting is adjustable as well and allows more flexibility - I attached it to the oem point instead of the rear peg hole. The cone is also attached with screws which provides access to the inside of the pipe. The nfield megaphone uses rivets, which do tend to leak and create darker areas around them. I havent used the megaphone long enough to know if the same will happen, or if the pipe will yellow, but I would guess that it wont. Another nice part about the Emgo is that it comes with the reducers, so its possible to get a nicer seal on the joint to the header. I did use some exhaust gasket sealer from a local auto store anyway, because I didnt want it to leak there and I did notice a little blow-by where the Emgo pipe has its single slit.

The look is pretty much identical, and the clamp used to install it is MUCH nicer looking (chromed and simple looking), although the area around the joint is very ugly because of the welding on the header. the quality of the chrome is much better and overall the pipe feels more solid, without a ton of extra weight over the nfield megaphone.

BTW, the emgo came prewelded with an inner perforated stop about 2/3 of the way to the end of the pipe. I didnt even try the exhaust with this in there because I wanted the max flow possible and dont care as much about sound as I do HP. Hopefully the C5 didnt need that back pressure! Perhaps there is a slight loss in torque, but I couldn't tell. Here is the perforated area I removed with a stick, metal pole, sweat and a rusty hammer. This mod also cost three splinters.

Isnt that pic artsy-fartsy?

The sound is quite similar, although the tip does give it a slightly different burble, perhaps not as nice actually. It is about 20% quieter, which is good, and overall sounds very similar. Its lost 50% of that nice off throttle growl, which sucks, but it is a more livable solution. Backfiring is down easily 50%, and when it does backfire, its not a gunshot, more of a screen door slam. :) I'm going to reserve final judgement on the sound until the packing breaks in a bit.

Power between the two seems the same, although the loss of racket may make it be interpreted as being a bit slower.

You can see a pic of it mounted lower down (Napoleon mirrors section). You can tell that its emgo because the rear mounting bracket angles forward instead of back.
 
[---UPDATE---]

Welp, after 250 miles I thought my EMGO was getting a bit loud again - more backfiring too. I took it apart and here is what I found!


Basically all of the packing had blown out. I went out and picked up some "4 stroke professional" packing for $24. It is pink in color, stringy in consistency and was designed for off road bikes (all I could find locally). It came in a mesh bag, and I had to remove 80% of it to get it to fit in the EMGO. Its hard to stuff it in there neatly because the end of the EMGO has a restricted ring, so I just packed it the best I could trying not to deform the bag a bit too much.

The result is a much quieter ride on the bike, although someone mentioned that it does sound louder and snappier from a distance?! Perhaps this is a result of overpacking slightly? I think this will lessen as the packing breaks in a bit. Backfiring noise has reduced a LOT and its good now (I like a little backfire now and then). Overall, I'm much happier with the packing in there, but I still wonder if a different exhaust shape can improve the tone of the sound.. The moral is, if you buy an EMGO, buy packing with it and just repack it from the start.


_______Mirrors, Part Deux__________
The next thing to sort out was the mirrors. I was not happy with the nfield mirrors for the reasons listed above, so I had been looking for an alternative. I wanted the same look, I think it fits the bike. My local dealer had one pair of Napoleon mirrors left and they looked nice. I bought them for $80/pair and modded them similarly to the nfield ones - they were also designed to fit inside the bars.


Here is a bad pic of them...


They are of MUCH higher quality. They vibrate only a little (totally acceptable amount) and when off the throttle, dont vibrate at all. Installation was easy - just a bolt and lock washer through the end into the threaded bars. They have the preset stops like the nfield ones so they can be folded easy without losing the alignment, which is handy for tight spots. They look almost identical to the nfield ones, but are a bit nicer finished where the bolt head is (recessed). I'll get a tighter pic if anyone is interested. The quality of the mirror is also surprisingly good and the viewing angle is such that I can see behind and to the sides of me while riding. This top mounting seems to be a good position for safety (I've seen some run them lower, but I haven't tried that yet).

This is a great mod and the Napoleon-branded mirrors are great quality. These should be standard on the bike!

BTW, I used these little plugs from Napa to seal the holes left by the factory mirrors on the bars. They are a tight fit, so chop off 2/3rds of the splines in the event you ever want to remove them easily.


------------------------
Continued on the next post
------------------------
« Last Edit: August 16, 2010, 06:27:56 pm by Sub »


Sub

  • Bob's Your Uncle
  • Grease Monkey
  • ****
  • Posts: 435
  • Karma: 0
  • 2010 Black Bullet C5
Reply #1 on: July 29, 2010, 05:09:51 pm
___________________________________
_______Rear Taillight__________

Time to attack the rear fender..that license plate and tail light has to go. It was one of the first things on the bike that I noticed just didnt fit the rest of the bike. I ordered this rear plate holder/tailight off of ebay and it was part of my new rear fender equation. Its good quality and I think it fits the bike well.  


I also purchased a Kyrukan (sp?) LED taillight from nfield because I wasnt sure which direction I wanted to go. I decided to use the ebay Ford replica light, so if anyone is interested in the LED one let me know. I never installed it, but did test it and its impressively bright.

I also purchased the lay-down plate holder from nfield. It its a simple part and made the installation much easier. I only needed to drill three holes, and then sandwich the license plate, the ford tail light bracket and the lay down mount and it went together nicely. This saved a LOT of time fabricating and the part is very inexpensive. My only complaint is that it doesn't perfectly fit the curvature of the rear fender, but its close enough to not notice from a few feet away.

Onto the mod..

First job was to remove the oem rear plate holder assembly. Its very easy - two bolts inside the fender and it pops off. Its hard to see in the pic, but there are three holes, two for mounting top and bottom and a larger one for the wire looms. The oem plate holder left a mar in the paint towards the top there after just 300 miles. Maybe it will buff out.:


Here's a shot after drilling the fender to fit the plate holder. Three holes needed to be drilled surrounding the bottom oem hole (which is more of a slot). I spent a lot of time here aligning such that the new mount covered the bottom most hole, and the plate's orientation was vertical. There is an option with the plate holder bracket to make it lay down on top of the fender, but I thought this vertical look suited the bike more. I did clean up and paint the bare metal after this was taken:


Here is the plate holder:


Here is a picture of the taillight sandwich.. outer chrome frame (didnt end up using), license plate, tail light bracket, nfield lay down mount, and rubber angled standoff (didnt end up using, used the thin one on the floor there instead):


To clean up the rear fender on the outside, I opted to put the wire mess inside the fender. I didnt want to cut the connectors off of the wires if I didnt have to. I only needed to cut the wire harness from the oem assembly, but it would be easy to repair later, so that didnt bother me too much, and it made the new rear taillight very easy to install/remove:

 I was worried about the wires hitting the rear tire and I probably could have zip tied the mess to a bit higher in the fender where its currently secured, but I wanted it more towards the back in the event I bottom out the bike, it will never hit. I made a simple bracket to take care of all the mess and keep it securely in place. Its a fairly sturdy piece of stainless steel that I wrapped in large shrink tubing. I simply cut it to size and then drilled a hole.


Then I bent it twice to make room for the connectors..


This is what everything looked like in the end. You can see I used the top installation bolt for the rear plate mount. Again, I used the rubber-backed washers to seal off the fender.


Next up was the turn signals. I thought for a while about where to put these.. There are few options on the C5, most would require some sort of custom bracket. I had been waiting on the nfield signals for a long time, and since I was ready to do the tail light, I needed something quick to remain legal.

I found these turn signal lights at a local car parts store. I am really surprised how good they look on the bike! They only cost $7 for the pair! I may just leave them on there for a while. I did end up swapping the bulbs from the oem housing because they were brighter by about 40%. The turn signals come with a L bracket permanently attached to the housing. I just needed to widen the far hole and use the suspension top mount bolt to secure it. This worked out great and was quite easy to do. The signals get their ground from the mount itself, and only one lead needs to be connected to the appropriate turn signal wire. I tapped it under the seat - its very easy to do this here. I used Ttaps temporarily, but will solder them properly later when I get my wire jacket spreader back (its on loan :) ). I used small wire loom (not pictured here) and tucked the wires along the fender frame to the seat area. Its hidden pretty well.


Here are some finished pics..


With the lights on.. (looks brighter in the pic than in person). I am planning on trying to find a lower wattage bulb anyway for this driving light. I think this is a 15 watt.


Closeup..

I used a normal rubber grommet to fill the large oem hole and some 1/2" wire loom to neaten it up a bit.

You can see I had an extra hole left over on top. I had these tiny little chrome plug fillers, so I just stuck one in there. You could also use a sticker I guess. :)


_______LED Parking Lights__________

Realized today that I had some 14V LED lights lying around from an old project. They aren't super bright, so they wouldn't be good as turn signals, and they are too small a socket anyway. It occurred to me that they would fit the parking lights socket perhaps.

The model # is BF304-0CW-014B. They have four 5mm-LEDs and a 120deg viewing angle. They are cool white (light blue ) in color and 8000K. The base is mini bayonet, 9mm, BA9. They only draw .03A at 0.42W. Brightness is 3300 mcd.


Here is a comparison to the stock PL bulbs:


Installation is easy - one screw to remove the bezel, and then remove the rubber surround holding in the plastic covers. I was wondering about the large head on the LED bulb, but it fits nice and snug in there:


LED Lit:


The left side is LED, right is stock. The LED is definitely brighter and light blue in color. I'm not sure it would actually illuminate anything at a distance, but definately would make more more visible at night. I did cover the headlight and wave my hand in front of the PL and I could see shadow on the wall 10 feet away, so they do project a little.


Both installed:


_______Hobbico VoltWatch Battery meter__________

Ok, so I had a bit of time tonight, so I decided to add the voltwatch to the Enfield! The Voltwatch is a very small (about 1.5" long) battery indicator. Its actually designed for R/C hobby applications, like monitoring the health of your lead acid field batteries, but its robust enough to have people install them actually on R/C planes and cars. It only costs $11 - http://www3.towerhobbies.com/cgi-bin/wti0001p?&I=LXDXG9&P=7


Because its digital I wanted to hide the indicator, and the easiest place to do that and grab power/ground was in the fuse box/electronics area. Installation was really really easy and took about 30 minutes with my lazily approaching it. I attached a ring terminal to the negative lead and attached the ring terminal to the screw at the bottom of the enclosure (which holds the box on, so its a good ground). Then I just stripped the red lead and solder coated the wires for strength and folded it over one of the legs of 20amp fuse and slid the fuse in. Its ghetto, I know, but the lead is so fine, its not going anywhere. I neatened up the wires and VHB'ed the indicator and switch to the ECU (at least I think thats what it is).

This is the install. You can see the switch and indicator at the top left behind that rubber mounting band. Then the red wire going to the fuse towards the middle, and the nut at the bottom holding the ring terminal on.


Here is a pic of just the ignition on, bike is off - reading right at 12v.


Here is a pic of the bike running. The voltage shot up to 12.5v, but to read 13v+, I had to give the bike a bit of a rev. I haven't ridden in a few weeks, so my battery is probably a bit low. She still started right up with 12v indicated though.


---------------------------------
Next mods..
-Pedestrian slicer (already cut and installed the vinyl graphics, just need to install on the front fender:


« Last Edit: June 11, 2011, 04:18:31 am by Sub »


Ducati Scotty

  • Grand Gearhead
  • *****
  • Posts: 7,038
  • Karma: 0
  • 2010 Teal C5
Reply #2 on: July 29, 2010, 06:57:23 pm
If that's the inexpensive little megaphone I think it is, you can easily take it apart with a few screws.  When you do, you will find one or two pathetic wraps of fiberglass around the center baffle barely held in place by a carelessly tied wire.  Get yourself some good muffler packing fiberglass at the local moto shop for about $20 and repack the muffler.  It will still be pretty loud but it will knock off some of the raspy high notes and make it more of a low growl.  Inexpensive and easy.

Scott


Sub

  • Bob's Your Uncle
  • Grease Monkey
  • ****
  • Posts: 435
  • Karma: 0
  • 2010 Black Bullet C5
Reply #3 on: July 29, 2010, 07:01:14 pm
If you're talking about the Emgo, yes thats it. Its loosely and lightly packed and secured by wire.  I was actually thinking about taking the packing out to see what the effect is. :) I was basically looking for everything that the megaphone is but 20-30% quieter.

Onto more mods!

_______Air Box!__________
Well, after many months, a winter-long procrastination, and a lot of thinking, I finally finished my air box mod.

I originally wanted to just use the Ace air filter that is popular with the older iron barrels, but when I got it, I didnt like the fit because it stuck out too much and hit my leg at stop lights when my feet were down.
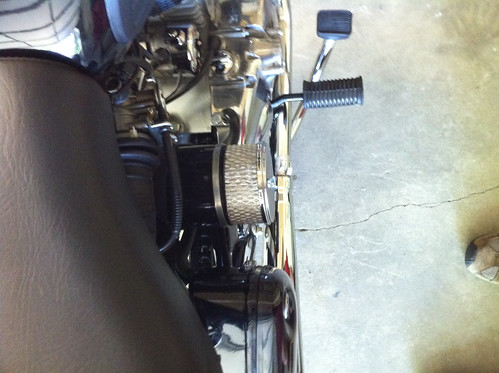

It does look cool from the side though!

..so I started to make my own. here I am drawing a straight line around the can, and afterwards I belt-sanded it to the line. This is actually a laboratory beaker that happened to be just the right size for the air filter kit I found at Autozone (same exact top filter section that ACE uses).

Next thing to do was to remove the tool box - pretty easy, just a few bolts.
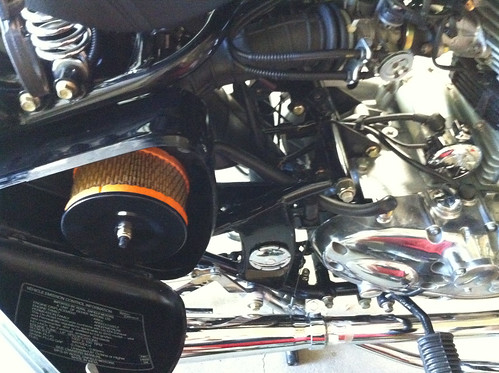

I needed a way to sandwich the top filter element and the bottom can I made, so I was thinking of using some edging, but I didnt like the look and later went with it just pressure fit (the can was the same diameter, and the filter's mount edge is flared, so it fits snug!
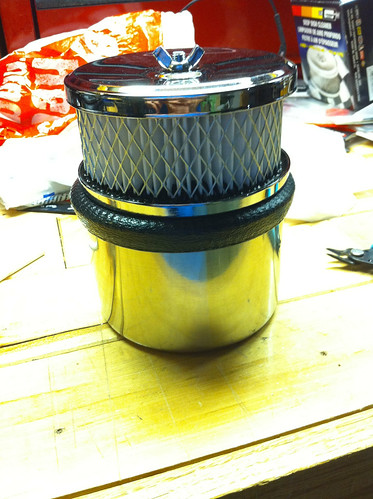
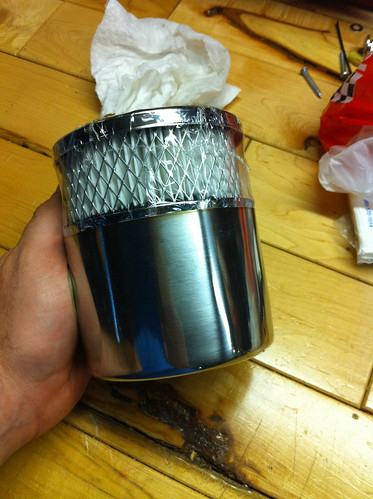


Here is the size compared to the ACE:
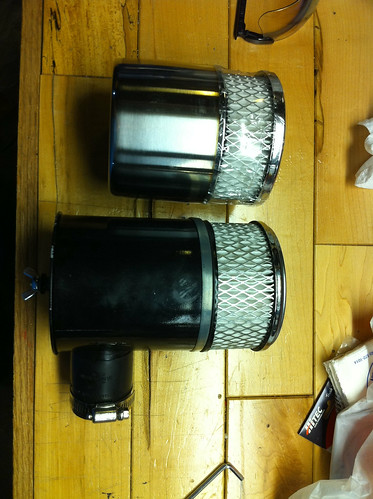

I used a hole saw to knock out a hole for the tube that joins to the plenum. Here you can see the filter sandwich and  the center rod I used to hold it all together.
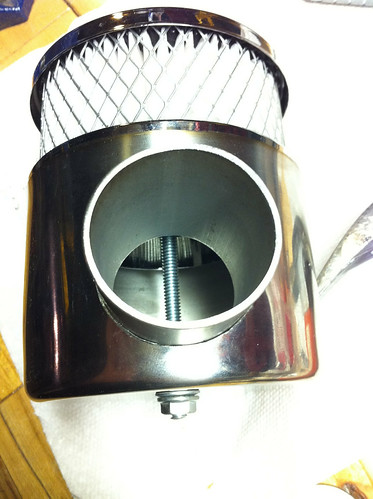

I used one of the oem holes to mount the center rod, it worked out to be a good spot.


Test fitting:
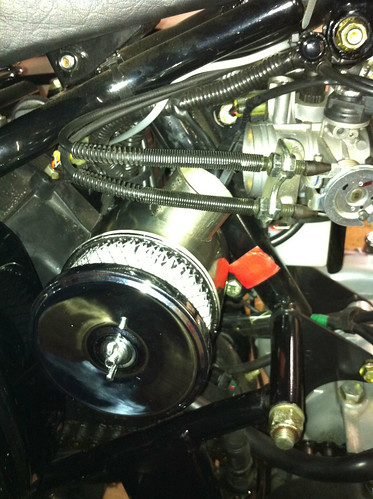

You can see the air box is much closer to the plenum now. Its hard to tell but its actually angled towards the center of the bike slightly, as well as towards the front quite a bit. This is because I tried to keep the air flow as straight as possible. I was worried that the MAF would get turbulent or a side-biased air flow and cause running issues. There is probably about a 30-45deg kink here. I originally was going to come straight off the plenum and then 180 back into the air box, but I liked this later setup better.


You can see here that I didnt butt the export tube right up to the can's edge. I drew it in towards the center of the can because I wanted air to be able to be sucked in from all areas around the pipe cleanly. BTW, the tube is the same ID as the bike's plenum.
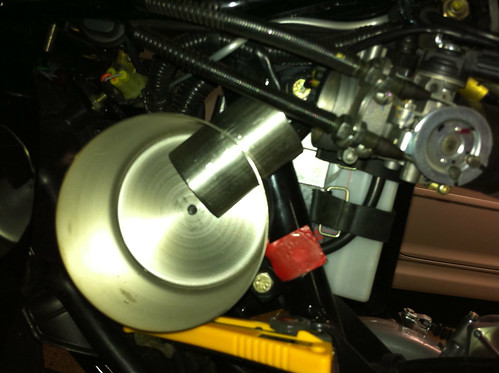

Onto the welding.. We filled the airbox with argon to make nice welds inside and out. My buddy Sam here is a fantastic welder - his trade!


Finally, I spent a lot of time cutting up a radiator hose I found at Autopalace. They were nice enough to let me parooz the plethora of radiator pipes they have. It was the perfect ID for the intake plenum and had the correct 45deg bent section. I used a hose clamp on the MAF side, but the can side is quite tight so I didnt bother. The hose was about $12.

Here are some pics of it mounted on the bike. You will also notice that I used a little $7 crankcase air filter from Autozone. I used a bit of clear tubing and attached it to the other bolt that was left exposed after removing the tool box. I do notice some oil spray in the tube from time to time, but it hasn't climbed more than a couple inches yet. I left plenty of hose and a low spot so if it does start to collect, I will notice it. I guess this isn't as big a problem on the UCE as the iron barrel, but some have still reported lots of oil in their OEM air boxes, so it can happen.


Note the discoloration of the EFI pipe. It looks a bit browner in person. Anyone else have this problem?


The width is great; it doesn't hit my leg at all at stop lights and if you look from the front, it is behind the motor's lowest fins, but still is drawing cleaner, colder air than the oem air box.

So, how does the bike run? Pretty good! I spent about 200 miles on the bike today so I got a good idea. I actually dont notice any increase :( or decrease  :) in performance, but I did notice a difference in sound. :)  The UCE has a really nice honking intake noise when you get on it. I did run the intake sans filter (just panthose zip tied around the plenum) for about 1/4 mile just to see what it sounded like. Id say the way my setup is now is about 1/2 as loud as with no filter at all... so its still pretty quiet. The only running difference I've noticed is a slightly lumpier idle, so I may have to put my idle up 100rpm or so. I previously set mine as low as it would go without staling, so it was probably a bit low to start with.

My main goals were to claim back that rear storage area and get more of that period look. I am able to store a bottle of water, the tool kit, and spare lights/fuses/wallet/sun glasses/whatever in the newly claimed space. I did have to duct tape off the holes that were left, but that was no big deal. The only other negative is the rain factor, but I NEVER ride in the rain, and even if the air filter was soaked, water would pool well below the air intake inside the can. I stopped worrying about this when I saw so many Harleys with exposed air filter elements.

So, what do you guys think!?

_______EMGO shorty exhaust pipe mod with snuff r not__________

In my search for exhaust tone nirvana, I've tried a few pipes now. My favorite so far is the EFI, but I want it a bit louder... but not all the time. I decided to try a custom snuff-r-not setup with what I think will be a really loud pipe. I guess these things were popular on Hondas back in the day, and today there are even electrical versions available for Harleys and the like. This is what the old one looked like:


You just rotate the dial and it essentially closes or opens the pipe diameter. You can still find these really old things on ebay, but I wanted to make my own.

Here is the pipe and my planned washer/screw combo.


It occurred to me that I could stack washers for more or less baffling effect, but initially I'm just going to use one washer. Note the pipe has a removable baffle which runs the length of the pipe (about a foot long). This combined with the snuffrnot will let me tune the pipe quite a bit - more or less or no baffling and open or mid or closed snuffrnot.
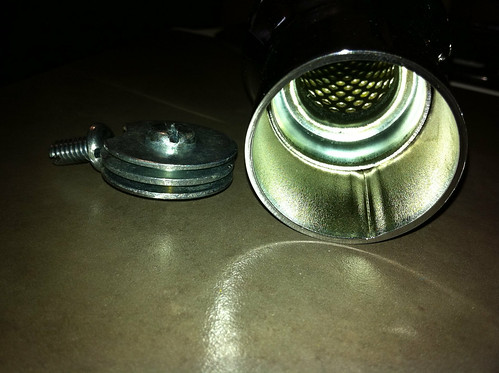

I ran into a problem pretty early with the EMGO pipe - its the same ID/OD as my C5's headers, so I learned on this forum about pipe spreaders. Here is one from Harbor freight. You basically turn the hex end and it spreads the bars apart.
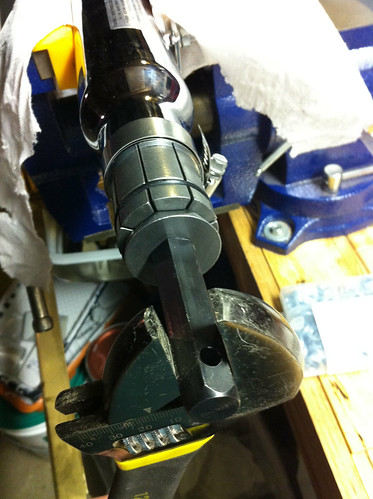

But it didnt go so well..
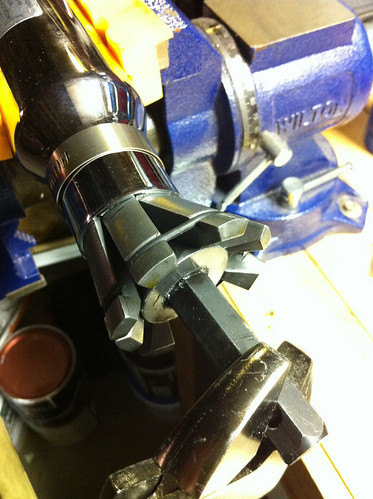

This pipe is strong!! I used a clamp loosely around the pipe so I could gauge the spread but I couldnt even budge the pipe ID. It simply broke the tool! Its ok, HF will take it back! Plan B - I went to a local Midas muffler and the mechanic was nice enough to open the pipe up for me on his spreader. I couldn't believe the power of that machine! It spread the pipe like it was butter. They didn't charge me but I gave him a nice tip for his time. Thanks Midas!

Here is a pic of the snuff r not installed. It took a while to put the right combo of washers and lock washers and springs in to make it move smoothly, but still keep is position securely. I ended up not using a spring, but just a lock washer, and a flat washer inside. A nut holds it together and a aluminum knob I had lying around went on too. I tapped the inside of it and it also uses two set nuts. I flattened the threads where they lie. I did have Sam weld that washer to the screw head, and I used a longer screw than was  initially pictured above to allow space for the knob to grab onto.
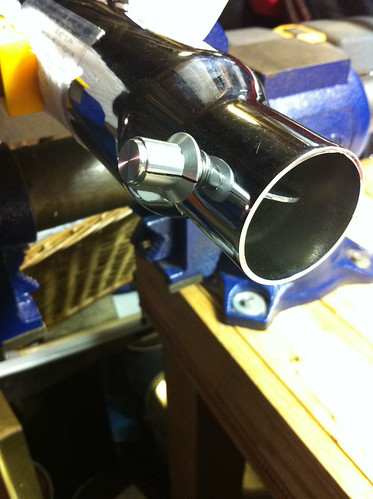


Open:


Note that the line on the knob correlates with the position of the washer, so I'll always know how its angled.

Closed:


BTW, you'll note that my snuff-r-not will be before the muffler, not after. I am not sure how that will compare to having it at the end of the pipe as its historically been mounted. I wanted it to be close me so I could reach down and adjust, so that was my main reason for the forward mounting position. I can always pop a hole at the end of the pipe if it doesn't work mid-pipe for some reason.
So, how does it sound?!  I dont know yet! I want to let the air box mod run for a bit till I go making another big change. Stay tuned..

..[update]..
Ok well that didnt work at all! The bike ran really badly - stuttering and popping, so I took it off after a handful of miles. I think this bike needs a longer pipe/backpressure to run properly. I think the shorty was just too short! The baffle did seem to help the noise a bit, but perhaps it would be more effective at the end of the pipe.

Here are a couple pics of it on..
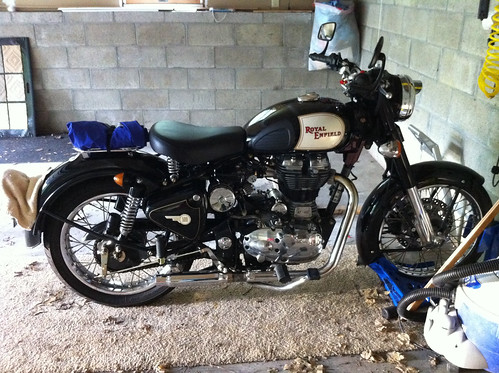


Oh well, it was fun to try. :) I've put the EFI back on for now...

_______Air Box part deux!__________
The air box has been really great, but I felt like it maybe could use a bit more air. I stuck a second filter on top of the original and extended the center threaded rod.
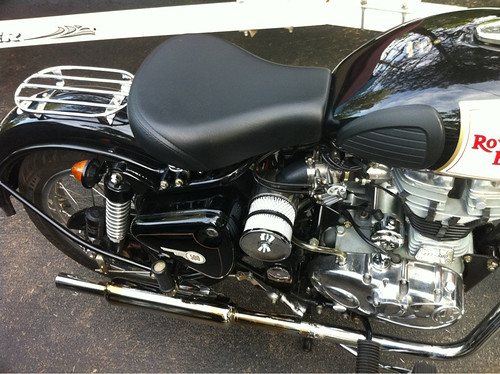

..and it ran better! Much smoother, perhaps a bit more power, and a bit more noise, which is a good thing - intake noise sounds great on these bikes.

So I went and ordered a couple K&N filters that were 4". I ended up liking this one the best, I think it looks hot on there!
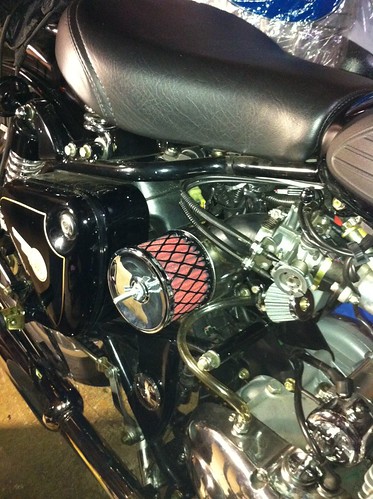
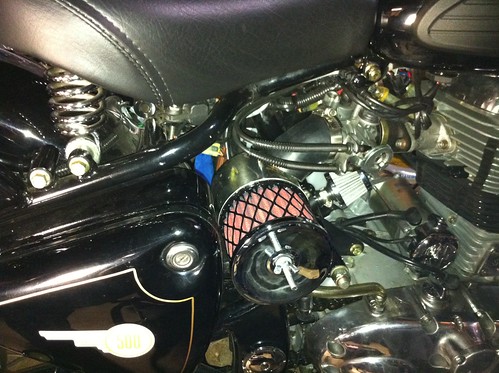

it has a nice retro feel to it. The outer mesh is metal. The bike runs great with this filter.

_______NGK plug!__________
I also replaced my plug to a NGK br6es (I think I have that # right) that everyone seems to be installing, and in the short run I've taken with it so far, it did improve the running of my bike slightly. It seems a bit smoother. Here is the plug I took off.. does it look ok?!
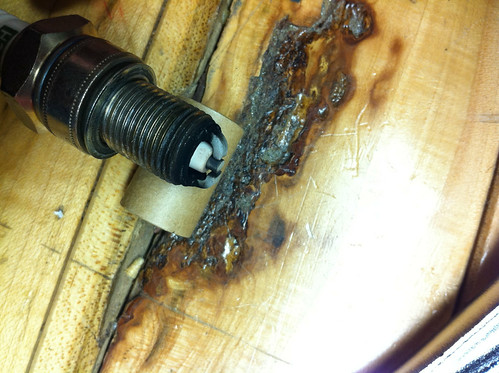

_______Heated grips!__________
I ordered  set of these grips off of amazon. I liked the look of them and the controller switch looked like quality from the pics.

The first thing I had to do was get the stockers off. The left side was easy, it just pulled right off. The right was a bit harder, but once I coerced it past the humps, it came off. I thought this step would be harder than it was. Underneath, the throttle side has bumps to the left and right side of the throttle sleeve.
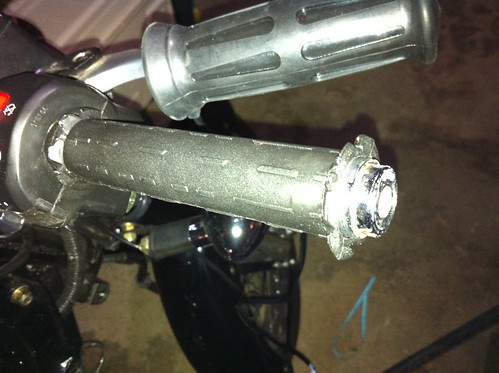

I had to snip those off for the aftermarket grip to fit.
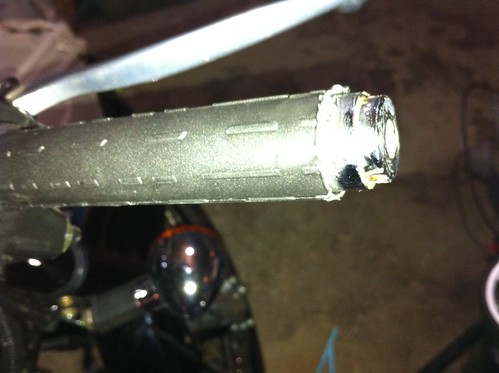

The aftermarket grips are closed on the end, so I had to carefully slice off the ends so that I could put my Napoleon bar end mirrors back on. you can see here I used a small piece of shrink tubing to cover the chrome that was exposed on the right side. I had previously used rubber tubing, but thought I'd try the shrink tubing this time.
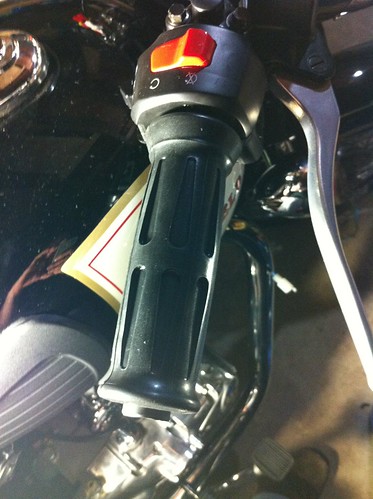

Here is the left grip:
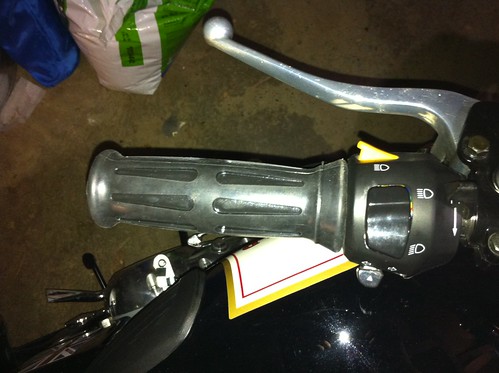

Next up was to mount the switch. I spent a while looking for a good spot but there really isnt one that is reachable and unobtrusive, so I just decided to throw it on the bar with the enclosed mount. Its pretty secure on there now.
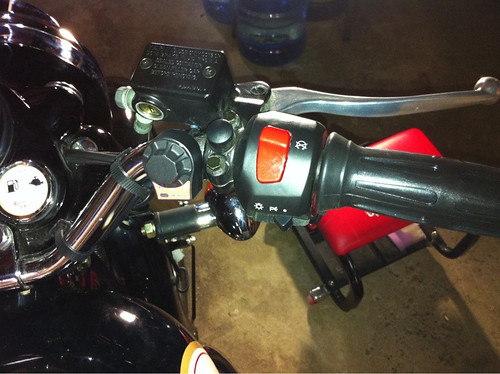

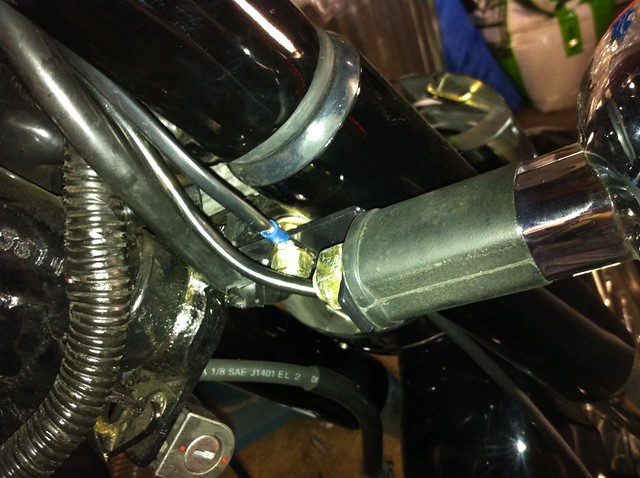
Next up was the wiring. I tidied up all the wiring from the grips to the headlight nacel. I used the stock straps. This is the best place I could find to tap ground. I didnt want to strip more wires than I had to in the nacel, so I used this right turn signal mount bolt.

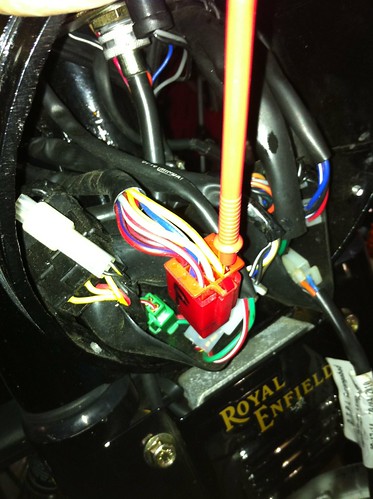
There are several switched power wires behind the headlight, but I chose this one because it was the largest gauge and went to the right grip. Presumably its starter headlight related. I stripped back some of the jacket and soldered the power lead to it, then bundled it back with electrical tape.

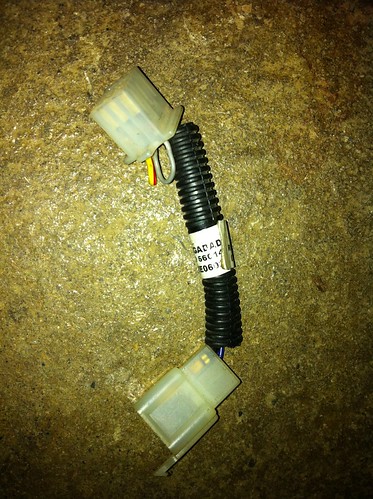
I also removed the US market dongle while I was at it.. Now my light switches work like magic! I also did this so that if I was running the bike at idle with the grips on, I could reduce some of the load by shutting the headlight off. But so far, the bike seems to work fine with the grips on high.

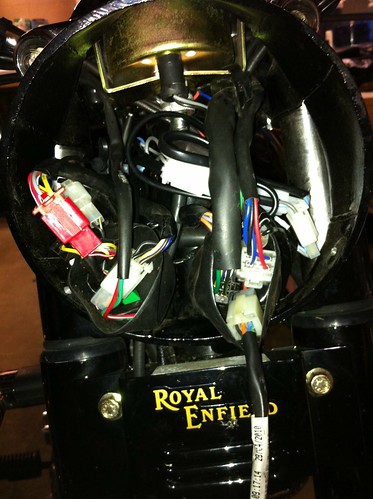
Here is a pic of all of the wiring tidied up. There is plenty of space behind there for wiring..

Overall the grips are great. They get quite warm on hot. I did notice that the right grip is quite a bit hotter than the left, which sucks, but I'm not sure how it reacts after long periods of time. I was wondering if because the left grip is right against metal if the metal was acting like a heat sink. If it was, after time the left should catch up to the right. We'll see! I did ride with them on today, and it was sure nice to have toasty hands. Fall rides will be a bit easier now..

The grips are also quite a bit wider profile than the stockers, and they get thicker in the middle, which I really like. The bike feels bigger in my hands now, more muscular somehow lol! :) It also surprisingly gives the bike a slightly different look at the bars, a little more chunky. I like that.

I also got (made) a new keychain dongle. Bonus points for anyone who knows who this is.

Next mod..
Exhaust heat shield to cover the ugly transition bit.
« Last Edit: June 30, 2011, 07:31:32 pm by Sub »


qgolden

  • Grease Monkey
  • ****
  • Posts: 302
  • Karma: 0
  • It takes a villiage to raise an idiot.....
Reply #4 on: July 29, 2010, 07:50:08 pm
I wonder if the pipe was "yellowing" because the MAP is now off?  You need that new Power Commander.  Be the first to test it out for the rest of us!   :D :D
Any other Enfields in New England?


Ducati Scotty

  • Grand Gearhead
  • *****
  • Posts: 7,038
  • Karma: 0
  • 2010 Teal C5
Reply #5 on: July 29, 2010, 07:59:21 pm
Anyone know if that works with the US O2 equipped models?  A lot of PC modules don't work if there's an O2 sensor.

Sub, repack it with new glass and an adequate amount.  I think you'll be pleasantly surprised.  Taking the packing out will make it louder.

Scott


qgolden

  • Grease Monkey
  • ****
  • Posts: 302
  • Karma: 0
  • It takes a villiage to raise an idiot.....
Reply #6 on: July 29, 2010, 08:13:23 pm
'Dunno, I asked the same question in the thread "Power Commander for UCE"

Maybe someone in the know will chime in.  I have in the past re-mapped my Harley's after drilling a 1/2 inch hole clean through the stock muffler through all of the baffle plates.  It opens them up to breath a bit better on the high end of the RPM's and keeps the noise quiet in the village on the low end. At an idle you can hardly hear the difference.  Opening it up on the highway it would sing pretty good.  If I pulled out to pass a car they knew I was coming around.  But the pipes were stock on the outside so they would not attact unwanted attention.

Loud Exhaust fine here in NH is $500.00!  >:(   

Planning to do that to the Enfield but not until I can re-map it. Lots of maps available for Harley, Lots of folks who can install them, for Enfield, not so much.

Any other Enfields in New England?


Sub

  • Bob's Your Uncle
  • Grease Monkey
  • ****
  • Posts: 435
  • Karma: 0
  • 2010 Black Bullet C5
Reply #7 on: July 29, 2010, 08:47:55 pm
I read somewhere that the EFI should be able to tolerate changes with the exhausts. I didn't worry too much about it because the Megaphone was sold through nfieldgear's own store, and was listed as compatible for the bike (Haha!). I believe the yellowing is a result of poor materials and chrome.


Chris-G5

  • Bulleteer
  • ***
  • Posts: 187
  • Karma: 0
Reply #8 on: July 29, 2010, 08:59:58 pm
I like your garage door opener mod.! I may have to do something like that.  I've just been carrying my opener in my back pocket.


Ducati Scotty

  • Grand Gearhead
  • *****
  • Posts: 7,038
  • Karma: 0
  • 2010 Teal C5
Reply #9 on: July 30, 2010, 12:20:48 am
I believe the yellowing is a result of poor materials and chrome.

+1.  You can polish it out but it comes back.


Sub

  • Bob's Your Uncle
  • Grease Monkey
  • ****
  • Posts: 435
  • Karma: 0
  • 2010 Black Bullet C5
Reply #10 on: July 30, 2010, 01:00:21 am
Has anyone seen a blacked out enfield pipe before? I was wondering what that would look like on a black c5.


Sub

  • Bob's Your Uncle
  • Grease Monkey
  • ****
  • Posts: 435
  • Karma: 0
  • 2010 Black Bullet C5
Reply #11 on: August 02, 2010, 02:34:00 pm
Chris, if you need help, let me know. It only costs about $25 for a replacement opener and switch.


singhg5

  • Grand Gearhead
  • *****
  • Posts: 2,785
  • Karma: 0
Reply #12 on: August 02, 2010, 03:46:13 pm
Your bike looks great with all the accessories that you have so passionately put on it.  Enjoyed your write up and pictures....
1970's Jawa /  Yezdi
2006 Honda Nighthawk
2009 Royal Enfield Black G5


Sub

  • Bob's Your Uncle
  • Grease Monkey
  • ****
  • Posts: 435
  • Karma: 0
  • 2010 Black Bullet C5
Reply #13 on: August 02, 2010, 06:08:54 pm
Thanks, I'm working on the tail light now.. Its a little more effort than I thought it would be. :)


Maturin

  • Grand Gearhead
  • *****
  • Posts: 789
  • Karma: 0
  • My Precious
Reply #14 on: August 02, 2010, 08:09:56 pm
Hey Sub!
Thanks a lot for this threat, I learned some things and saw a nice C5. Its exactly the kind of participation of others experience that saves us time & money.
Would you please be so kind and tell the serial number of your megaphone? These emgo guys have a couple of similar looking pipes in their catalog. Thx in advance
Maturin
2010 G5
A Garage without a Bullet is a empty, barren hole.

When acellerating the tears of emotion must flow off horizontally to the ears.
Walter Röhrl