Author Topic: Lucas MCH Headlight - How will it fit?!  (Read 3939 times)

0 Members and 1 Guest are viewing this topic.

grumbern

  • Grand Gearhead
  • *****
  • Posts: 667
  • Karma: 0
on: October 22, 2016, 05:06:41 pm
Hi,
maybe I'm just dumb, but I can't figure out how to mount the headlight to the rim, so it matches the housing/shell. The upper part is no problem, but the lower part is somehow bent out and doesn't allow for clips to be installed there. If I only use clips on the upper part though, the headlight will slip right out of the rim.

Has anyone got a good picture of how to do this?
Thanks,
Andreas


Arizoni

  • Grand Gearhead
  • *****
  • Posts: 7,412
  • Karma: 2
  • "But it's a dry heat here in Arizona
Reply #1 on: October 22, 2016, 10:07:44 pm
I'm somewhat lost with the "upper" and "lower" part but basically the 7 inch headlight replacement has two rings.

The inner ring has 3 holes in it and mounts on the casquette like the old headlight ring did.

The outer (front) headlight ring is what the bulb is mounted in.

The outer (front) ring does not have any screw holes in it.
Instead, it is hooked to the inner ring by a hook that engages the inner (rear) ring at the bottom.  A metal strap with a bent end and is held in place by a screw in the top hole of the inner (rear) ring, hooks onto the top of the outer (front) ring and holds it in place.

The bulb is held in place in this outer (front) ring by at least 4 (or more) W clips which should be approximately spaced.

The small bent center hook of the W clip hooks against the back of the headlight.
The two free ends of the W clip hook under the bent rim on the outer (front) headlight ring.

Check out the photo following my post in this link to see how the clips should look.

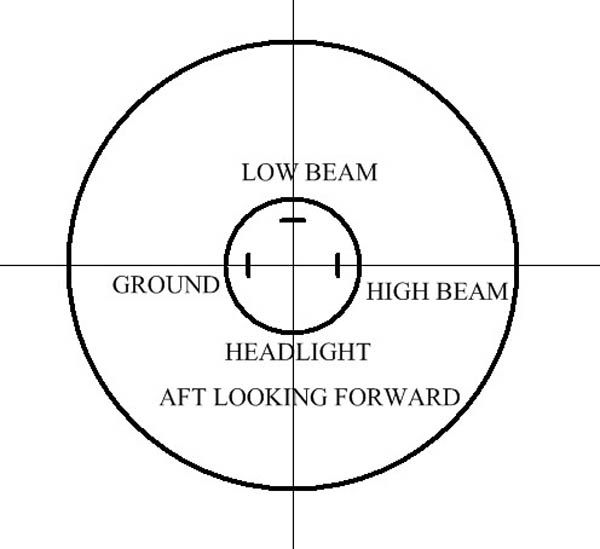
https://forum.classicmotorworks.com/index.php/topic,12715.msg142098.html#msg142098

While I'm talking, if the bulb has a 3 prong electrical connector on the rear, the part of the bulb which should end up being at the top when the rings and bulb are installed on the motorcycle has the 1 connector that is running at a 90° angle to the other 2 connectors.

It should look like this
Jim
2011 G5 Deluxe
1999 Miata 10th Anniversary


grumbern

  • Grand Gearhead
  • *****
  • Posts: 667
  • Karma: 0
Reply #2 on: October 23, 2016, 09:01:24 am
Hi there,
ok, I was afraid my writing was a bit confusing, but I struggle finding the right words :-[

Upper and lower half refer to the shell/housing (it's seperate, MCH60 type, not the casquette) and in the bottom half of it, it is bent outwards, so it protrudes a little into the headlight rim. There are two sections like that, maybe 5cm (2") long from the half of the shell to the bottom end, where the rim hooks into the shell. On the top end, there's a plate holding the rim, like on the bullet's.
Now the problem is, these protruding parts collide with the "W"-clips. It seems like I can't install these on the lower half of the rim, but then my headlamp will obviously slip out, only secured to the upper half of the rim.

I hope it's a little easier to understand now? :-[
Andreas


Adrian II

  • Grand Gearhead
  • *****
  • Posts: 4,143
  • Karma: 1
  • Sharing my ignorance with anyone who needs it
Reply #3 on: October 24, 2016, 02:57:20 am
I just checked on one of my headlamp rims, and there are two different ways of fitting the "W" clips, both ways will hold the lamp unit inside the rim, but only one way will give you the clearance you need to clear the protruding sections of the headlamp shell!

Make sure the centre of the "W" clip is on the INSIDE, pressing against the lip of the light unit, with the arms and elbows (Sorry, I'm tying to think of a better description) tucked into the inside of the rim, that should allow you to fit the rim properly. You might have room to fit a "W" clip at the bottom of the rim, straddling the tab that fits the slot at the bottom of the headlamp shell.

I hope this helps.

A.
Grumpy Brit still seeking 500 AVL Bullet perfection! Will let you know if I get anywhere near...


grumbern

  • Grand Gearhead
  • *****
  • Posts: 667
  • Karma: 0
Reply #4 on: October 24, 2016, 08:38:06 am
Hi Adrian,
this is basicly how I did it (picture taken from the topic linked above):


I think I'll have to bend the clips to fit, but it would be interesting, how it was supposed to be?!
Andreas


Adrian II

  • Grand Gearhead
  • *****
  • Posts: 4,143
  • Karma: 1
  • Sharing my ignorance with anyone who needs it
Reply #5 on: October 24, 2016, 04:46:35 pm
OK, the picture in your message shows the correct installation, but as there are different makes of clip the exact shape varies with different manufacturers (think copies of copies of copies), and some will tuck into the depths of the rim better than others.

Try a set of these, ebay item 122151825650:


A.
Grumpy Brit still seeking 500 AVL Bullet perfection! Will let you know if I get anywhere near...


grumbern

  • Grand Gearhead
  • *****
  • Posts: 667
  • Karma: 0
Reply #6 on: November 26, 2016, 10:27:38 am
Just to let you know: I managed to install the rim. I set one clip right at the bottom, two as close to the bent parts and two besides the rim catch.

I think, that should work just fine!
Andreas