Author Topic: Indian Chief build, looking for Information  (Read 102663 times)

0 Members and 2 Guests are viewing this topic.

bullethead63

  • Grand Gearhead
  • *****
  • Posts: 793
  • Karma: 0
  • "Run what ya brung..." Paul Saint Clair
Reply #90 on: July 21, 2016, 07:07:05 pm
You have set the bar high, mein freund...I can only hope my 1959 Chief restoration turns out HALF as well as yours is going!
1959 Royal Enfield/Indian Chief 700~(RED)~1999 Bullet Deluxe 500 KS~(BLUE)~2000  Bullet Classic 500 KS~(WHITE)~2002 Bullet Classic 500 ES~(GREEN)~1973 Triumph Tiger 750~(BLUE & WHITE)~Ride-Wrench-Repeat~your results may vary~void where prohibited by law~batteries not included~some assembly required~


grumbern

  • Grand Gearhead
  • *****
  • Posts: 667
  • Karma: 0
Reply #91 on: July 21, 2016, 09:24:50 pm
Thanks!
If you need any information I can provide, feel free to ask. Although I believe your's to be in a more original shape than mine was ;)
Andreas


grumbern

  • Grand Gearhead
  • *****
  • Posts: 667
  • Karma: 0
Reply #92 on: August 25, 2016, 10:28:51 am
Sandblasted the tank and painted it roughly to prevent rusting. A real progress: I have a seat! After 1,5 years of intensive searching for a seat pan of another model to make it fit on the Chief, which was without success, I really found a genuine Chief seat (should be of No. 44 of 800 ;D) and got it for only 175$! Even shipping and taxes added that is quite cheap. I feel lucky!


Upholster is to be done over and also the metal needs some attention. But it fits!
So long,
Andreas


grumbern

  • Grand Gearhead
  • *****
  • Posts: 667
  • Karma: 0
Reply #93 on: September 23, 2016, 08:12:55 pm
Bad news, the seat is a case for the bin! Beneath the leather it is rusted beyond repair. I'll just use it as a pattern for a repro...
But I made sprocket cover today. The original one was rusty and brocken so a repair including chrome removal and re-plating would be too much effort, if even possible. I chose stainless steel, so I wouldn't have to have it chrome plated and be free of rust forever :D

Left side the genuine part, right side the repro:


And same one mounted on the bike:


Still needs some additional work and buffing up, but I'm satisfied!
So long,
Andreas


Adrian II

  • Grand Gearhead
  • *****
  • Posts: 4,140
  • Karma: 1
  • Sharing my ignorance with anyone who needs it
Reply #94 on: September 25, 2016, 03:00:36 pm
 :o 8)
Grumpy Brit still seeking 500 AVL Bullet perfection! Will let you know if I get anywhere near...


grumbern

  • Grand Gearhead
  • *****
  • Posts: 667
  • Karma: 0
Reply #95 on: October 13, 2016, 07:23:29 pm
This time just a minor update, but not less important.

First a comparison of the oil pump sindles of the Chief (and other pre-1964 twins) and the Interceptor:


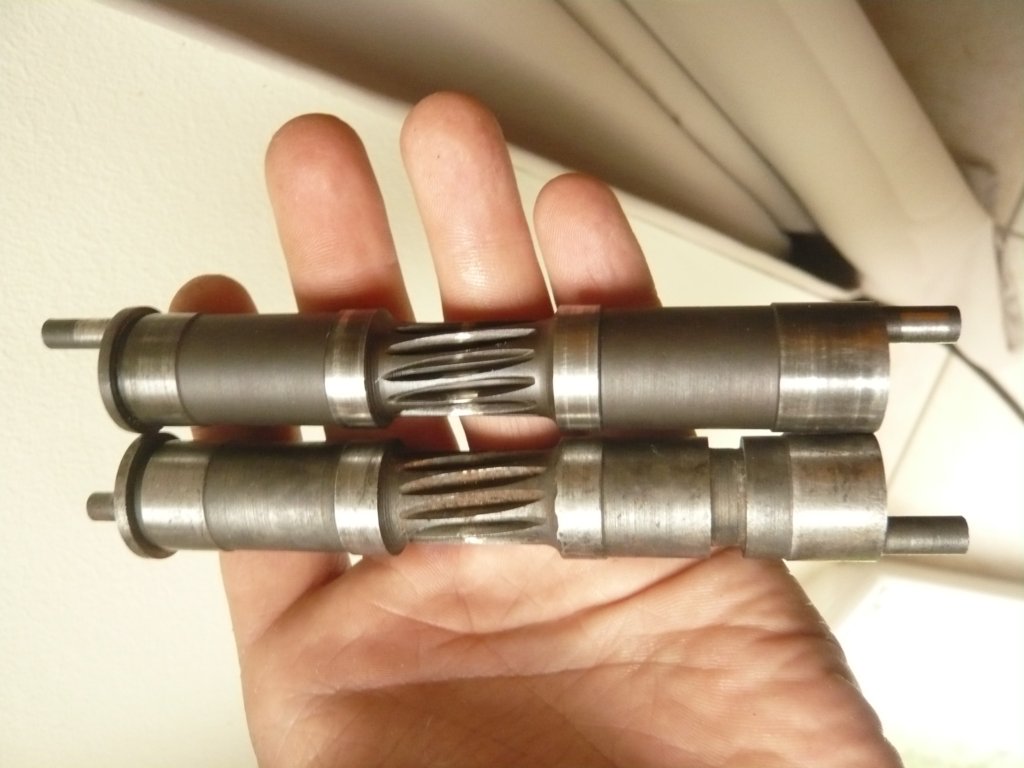
Easy to see, there are two main differences, being the groove left to the rear bearing and a 90° offset of the pump spindle crank pins.
Latter probably, to distribute the load and achieve smoother running. This can't be altered afterwards. The former can! The groove has a coresponding thread in the timing cover to take a bolt with a pivot, securing the spindle's axial position. Without that measure, the spindle can move forward and catch the pump cover, causing the crank pin to break - as happened to my Chief. Marks on other covers are proof, that this is very likely to happen and the touching up by RE shows, this must have been anything but unusual.

But the spindle is hardened and extremely tough, which makes turning  impossible, even with ceramic tools. I wasn't able to machine the groove that way. What now? It is possible to work quite accurate with angle grinder and a 1mm cutting disk and so I ground it with just some 1/10mm accuracy (letting the spindle turn on the lathe and wielding the grinder by hand):


The matching bore was easier to make. That's how it looks like completed:


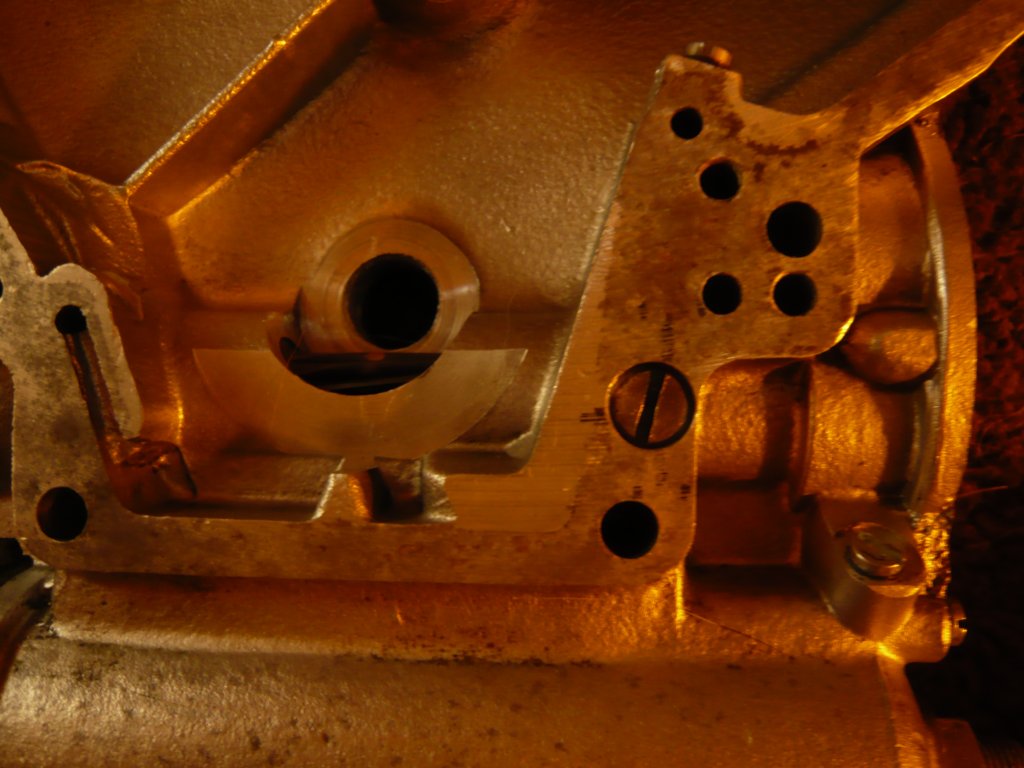
The spindle has an axial movement of only a few 1/10mm now - enough to allow for easy movement, but too few, to collide with the cover. Now I can be at ease, because the trouble such a damage causes I do not want to imagine and the spindles themselves aren't cheap at all.
So long,
Andreas


Adrian II

  • Grand Gearhead
  • *****
  • Posts: 4,140
  • Karma: 1
  • Sharing my ignorance with anyone who needs it
Reply #96 on: October 13, 2016, 08:24:53 pm
A nice bit of improvisation!

Was this a particular problem with the twins, or would this modification have benefitted the Bullet too?

A.
Grumpy Brit still seeking 500 AVL Bullet perfection! Will let you know if I get anywhere near...


grumbern

  • Grand Gearhead
  • *****
  • Posts: 667
  • Karma: 0
Reply #97 on: October 13, 2016, 09:25:11 pm
I don't know if the Bullets suffer from this, too, since their spindle is different. I would have to remove the front cover to find out (by simply pulling on the spindle and see, if the travel is enough to make contact with the cover). If so, I would recomend it. Mine is running fine though, just like many others, so I guess there is not that much danger.
Andreas


grumbern

  • Grand Gearhead
  • *****
  • Posts: 667
  • Karma: 0
Reply #98 on: November 26, 2016, 11:02:40 am
Just a little update.

The Chief's fork shrouds are basicly two pipes, that are conical at the top ends and hide the stanchions. These shrouds -like almost all of the Chief's tinware- are not to be found, and if, they are expensive and in a bad shape. There are similar shrouds used on the "Woodsman", "Trailblazer" and especially "Interceptor"-models, that even are reproduced. But those have little ears for the Headlight mounting welded to them, not needed with the Chief, thanks to it's central mount headlight. But at least you have a template with them and so I decided to reproduce these shrouds.

The biggest problem was to find a fitting pipe. There was none to be found with 1mm thickness in the right dimensions, so I had to use 1.5mm. Theres enough clearence to the shrouds, so the half mm doesn't matter, it makes working a little harder though.

That brings us to problem No.2, how to get the pipe conical? You could cut, bend and weld it. But then it would become asymmetrical, would have seams that'd need to be cleaned etc. and I don't like that. So I decided to try "metal spinning". That is achieved by pressing a spinning piece of metal, or pipe with a rod, or roller on a core and thus forming it into shape.

I made such a tool and this is the result before:


and after:


You can not easily see, but the shroud is now roughly one cm narrower on the right, than in the middle and ready for further treatment. The second shroud is giving me a little hard time flapping, although I used the same pipe and worked on it the same way. But I'll work on it.
So long,
Andreas


Adrian II

  • Grand Gearhead
  • *****
  • Posts: 4,140
  • Karma: 1
  • Sharing my ignorance with anyone who needs it
Reply #99 on: November 26, 2016, 11:44:40 pm
Taking "roll your own" to new extremes...  ;D
Grumpy Brit still seeking 500 AVL Bullet perfection! Will let you know if I get anywhere near...


grumbern

  • Grand Gearhead
  • *****
  • Posts: 667
  • Karma: 0
Reply #100 on: November 28, 2016, 08:12:55 pm
Some minor progress. The shrouds need two "ears" and a recess to fit them over the lower tripple tree and fix them. Therefor I drilled 1,5mm at the corners and cut using a "Puk-saw":


I could have made a straight cut for the division. But I feared to damage the shrouds, so I took a different approach: An X-shaped cut:


The now formed triangles are loose in the middle and only held a little on the outside. They can easily be bent and broken out:


Just bend the "ears" outwards:


Of course they will be trimmed and finished. For now they do fit!
So long,
Andreas


grumbern

  • Grand Gearhead
  • *****
  • Posts: 667
  • Karma: 0
Reply #101 on: December 01, 2016, 10:03:28 pm
In her new home and finally on her own "feet" again - well, almost:


grumbern

  • Grand Gearhead
  • *****
  • Posts: 667
  • Karma: 0
Reply #102 on: December 08, 2016, 10:30:53 am
The shrouds are almost done and I tried them on:


Looks good, but what makes me worry is this gap:


Maybe the length isn't right (should be, according to the "template")?!


Can anyone check with the length of theirs? I assume Interceptors, Trailblazers etc. should have the same and there are some Chiefs out there, too... :'(
So long,
Andreas


Adrian II

  • Grand Gearhead
  • *****
  • Posts: 4,140
  • Karma: 1
  • Sharing my ignorance with anyone who needs it
Reply #103 on: December 08, 2016, 03:46:34 pm
The Interceptor-style front end on my project has a bit of gap there, though rather less than that with the steering head races adjusted. Elongating the mounting holes in your new shrouds for the bottom yoke pinch bolts will give you some vertical adjustment (which will be enough in my case), as will a thick rubber washer under the chrome cap. You don't really want to have to weld a collar onto the top or have to make another set.

Conversely when I fitted Hitchcock 50's headlamp brackets and cafe racer top yoke to my Electra in 2006 the shrouded portion above the "ears" was too long and needed shortening by about the same amount that yours need lengthening!  ??? ??? ???

A.
Grumpy Brit still seeking 500 AVL Bullet perfection! Will let you know if I get anywhere near...


grumbern

  • Grand Gearhead
  • *****
  • Posts: 667
  • Karma: 0
Reply #104 on: December 08, 2016, 07:05:56 pm
Well, that's kinda strange, isn't it? If nothing else helps, I will go for a ticker Rubber washer. I already thought maybe the bearings aren't deep enough. Only thing that might ensure either therory, is measurements from another Chief. ::)

Today I found a lot of interesting ads for the Chief in some vintage "American Motorcyling" magazines, that I instandly bought 8)

So long,
Andreas