Author Topic: Indian Chief build, looking for Information  (Read 103155 times)

0 Members and 3 Guests are viewing this topic.

grumbern

  • Grand Gearhead
  • *****
  • Posts: 667
  • Karma: 0
Reply #195 on: January 15, 2018, 07:56:00 pm
Yesterday I polished the aluminium shrouds and cleaned up the springs today:


Everything greased up and put together, it looks like this:


Now I only need a good idea, how to compress the springs, without damaging the paint. Has anybody some advise wihtout using special equipment? I thought of using a drill press?!
So long,
Andreas


Grant Borden

  • It's Time to Ride!
  • Grease Monkey
  • ****
  • Posts: 260
  • Karma: 0
  • It's Time To Ride!!!
Reply #196 on: January 15, 2018, 08:39:07 pm
Many years ago I made a very crude tool for working on the shocks of a /2 BMW, cut a metal plate 4"X4" X3/16" with a hole in the center that would allow the top shock eye to pass through with a 1/4" hole on each side to accept 1/4" all thread, bent a 1/4" all thread in a "U" shape passed it through the bottom eye placing the plate on top of the shock with a piece of plastic between the top of the shock and the plate to protect the paint added washers and nuts to the all thread and tightened them up until the springs were compressed.

Hope this helps.

Grant
2016 Royal Enfield Continental GT
2014 Royal Enfield C5 With Cozy Euro Sidecar


Blltrdr

  • Grand Gearhead
  • *****
  • Posts: 2,079
  • Karma: 0
  • cycle-delic music
2003 Classic 500 5 spd
2009 HD FLHT Police 103 6 spd
1992 Kawasaki ZG 1200 Voyager XII


Grant Borden

  • It's Time to Ride!
  • Grease Monkey
  • ****
  • Posts: 260
  • Karma: 0
  • It's Time To Ride!!!
Reply #198 on: January 16, 2018, 12:21:00 am
That looked EZ and better than my 55 year old solution.

Grant
2016 Royal Enfield Continental GT
2014 Royal Enfield C5 With Cozy Euro Sidecar


grumbern

  • Grand Gearhead
  • *****
  • Posts: 667
  • Karma: 0
Reply #199 on: January 16, 2018, 09:15:33 pm
Oh yeah, nailed it!
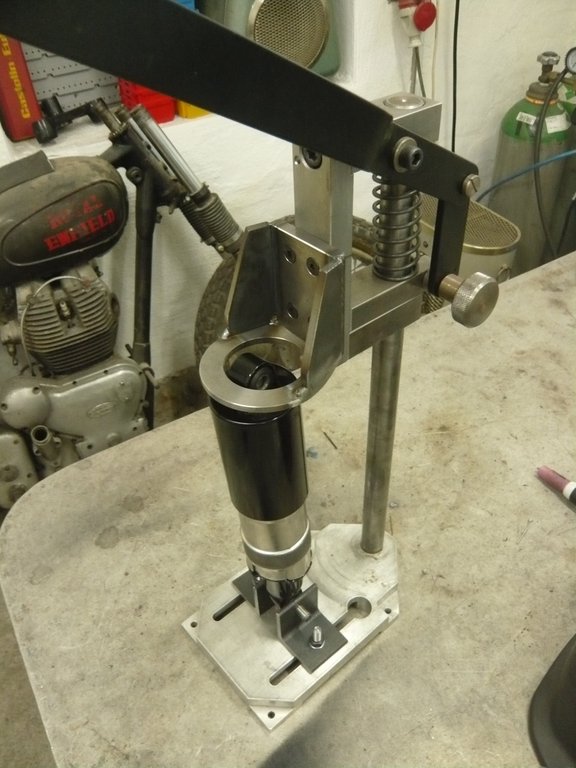
At our shop the trainees build drill presses from self made parts as an exercise. Some of them are never completed, or others just left there. One of these I took and modified it to suit my purposes. As the clamp for the drilling machine was missing anyway, that one was just perfect.
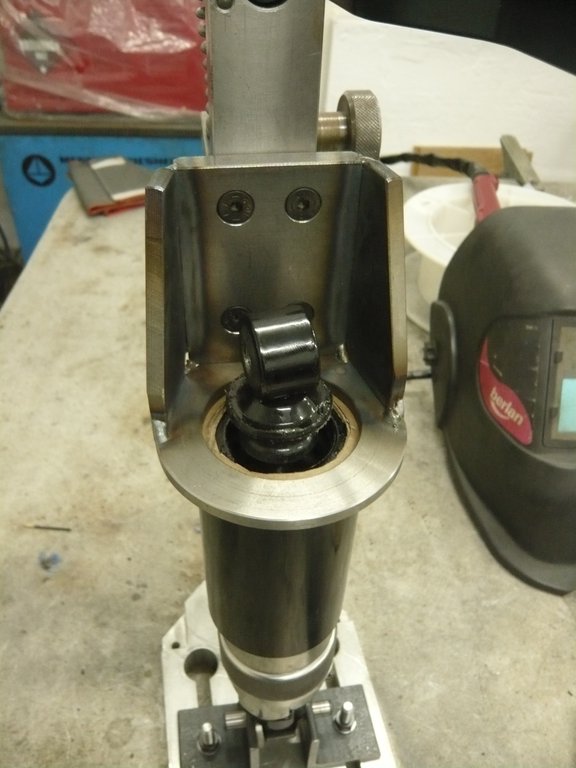
I made a ring to hold down the shroud, as well as bolting on a set of bored angles, through which a rod is put, retaining the lower eye:


For paint protection I put some cardboard between, but this gets stuck between the retainer rings. I'll have to machine a  fitting plastic ring, or attach some felt, or leather to to the ring?! We'll see!

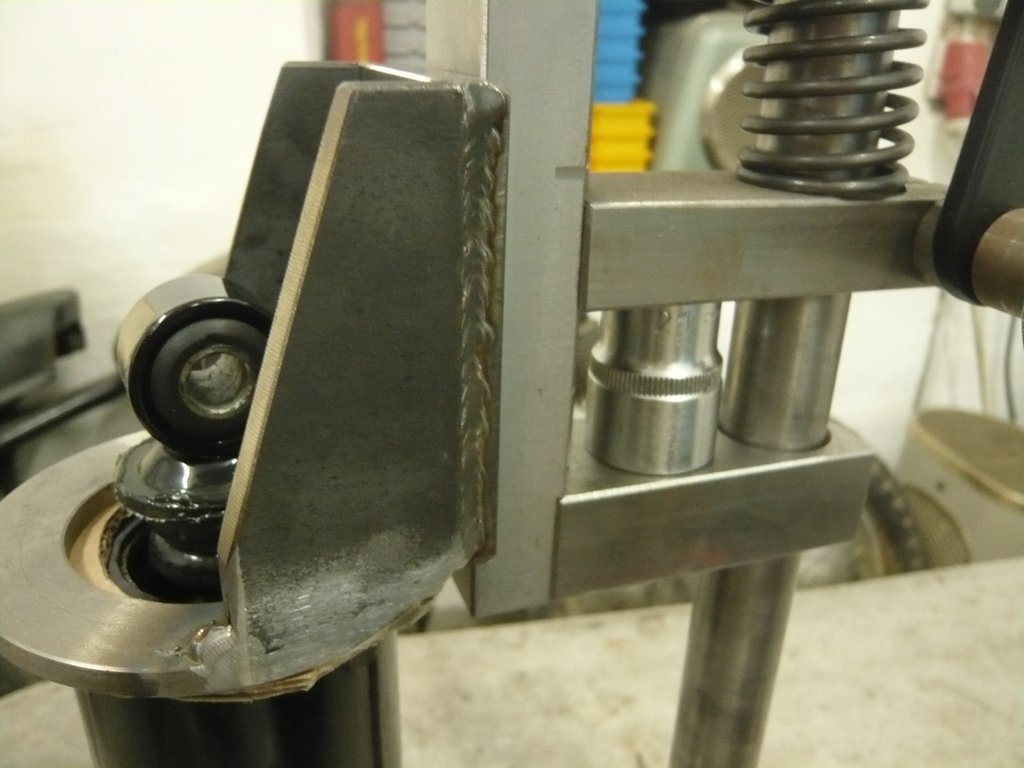
Compressing the springs anyhow works just great and with a long enough nut, it can be fixed in it's position:


So long,
Andreas


High On Octane

  • Grand Gearhead
  • *****
  • Posts: 6,075
  • Karma: 0
Reply #200 on: January 17, 2018, 01:02:05 pm
That's awesome!  Like it was meant to be!  Oh, and hey.  I found your 10mm socket in that last pic.   ;) 

Scottie
2001 Harley Davidson Road King


grumbern

  • Grand Gearhead
  • *****
  • Posts: 667
  • Karma: 0
Reply #201 on: January 17, 2018, 03:49:59 pm
Haha, yeah, it does! But it's actually a 21mm socket (that's what I meant with "nut" - false friend here, in German the word "Nuss"="nut" would've been right for socket. A nut would have been "Mutter", which is similar to "mother". Funny, if you think about it ;) ).
Andreas


grumbern

  • Grand Gearhead
  • *****
  • Posts: 667
  • Karma: 0
Reply #202 on: January 18, 2018, 11:35:54 am
Just glued some leather to the ring for protection and assembled and mounted the shocks:


Another step taken 8)
So long,
Andreas


grumbern

  • Grand Gearhead
  • *****
  • Posts: 667
  • Karma: 0
Reply #203 on: January 20, 2018, 07:28:04 pm
Today I finished sanding the primary cover. Now it can rest for some hours and tomorrow it's up for polishing. But yet again, there are "clouds" showing up on the surface. ::)


The castings just aren't the pick of the litter, there are tiny pores everywhere, too. These can't be removed or polished (obviously) and starting from there it will start getting dull again. Be it as it may, I'll just do what can be done and what can't be done just can't be done - that's it. ;)
So long,
Andreas


grumbern

  • Grand Gearhead
  • *****
  • Posts: 667
  • Karma: 0
Reply #204 on: January 22, 2018, 11:25:34 am
The primary cover is done and waiting for the oxide layer to build up completely, so I can clean it:


Here you can clearly see the fine dents in the surface >:(


So long,
Andreas


grumbern

  • Grand Gearhead
  • *****
  • Posts: 667
  • Karma: 0
Reply #205 on: January 28, 2018, 06:52:51 pm
Installed the cover and I think it looks nice!


Also had the Chief on it's wheels for the first time since the rebuild! Man that thing really is a bit "more" than a Bullet, but still not as heavy as it looks ;)
Forks are very stiff and I gues I'll have to loosen and reallign everything for a smooth response.
So long,
Andreas


High On Octane

  • Grand Gearhead
  • *****
  • Posts: 6,075
  • Karma: 0
Reply #206 on: January 28, 2018, 08:42:37 pm
Very nice Andreas!  It is really coming along nicely.  Do you have fenders yet?  And are you painting the tins red?
2001 Harley Davidson Road King


grumbern

  • Grand Gearhead
  • *****
  • Posts: 667
  • Karma: 0
Reply #207 on: January 28, 2018, 09:21:31 pm
Well, I have a rear fender, that still needs a lot of work. Maybe I'll even have a new one made - I don't know. There ware very few people who do such metal work at a decent price. The front fender is still at the previous owner and I have to collect it there, and bring the finished bike with me - that was the deal for getting the fender. It's a good 1000km journey, but still the easies way to get one of these :P

And yes, I will have them painted in "polychromatic red burgundy", just like it left the factory on the 14th of November in 1959 8)
So long,
Andreas


grumbern

  • Grand Gearhead
  • *****
  • Posts: 667
  • Karma: 0
Reply #208 on: April 04, 2018, 06:58:20 pm
Not too much happened in the meantime. I got a front fender and both front and rear are going to a guy who will fix them properly. Should be done until May.

Still some minor things have happened. The original Enots fuel tap was leaking, so I made some new seals out of cork, to replace the old dried out shrunk ones.


So long,
Andreas


Adrian II

  • Grand Gearhead
  • *****
  • Posts: 4,143
  • Karma: 1
  • Sharing my ignorance with anyone who needs it
Reply #209 on: April 04, 2018, 10:23:34 pm
Somebody once sent me some pictures of a Fury he had restored. Lovely job, then I noticed he fitted a cheap Indian Bullet fuel tap and clear braided plastic fuel line...  ???

No danger of cutting corners with THIS rebuild, I believe!  ;D

A.
Grumpy Brit still seeking 500 AVL Bullet perfection! Will let you know if I get anywhere near...